How do you buy a used hiking backpack that fits?
Quick answer
Choose a used hiking backpack by torso length and hipbelt fit before capacity or brand. Try it with a representative load, check whether the harness adjusts to you, and inspect the seams, buckles and interior coating. A clean pack that cannot carry comfortably is the wrong purchase, even if its original price was high.
Start with the trip you actually take
A weekend camping pack, a day-hiking pack and a travel backpack solve different problems. Write down the equipment you need to carry, the longest stretch between resupply and whether you need room for a bulky sleeping bag or bear-resistant container. Litres describe space; they do not tell you how comfortably the pack will carry that load.
Ask for the full model name, size label and approximate generation. Some packs come in fixed torso sizes; others have an adjustable harness with a limited range. Detachable hipbelts can have their own sizes. “Large backpack” in a listing may describe capacity rather than body fit.
Osprey’s fitting guide distinguishes torso sizing from waist or chest size and recommends fitting with weight inside. Use the manufacturer’s instructions for the model you are considering rather than assuming every harness has the same geometry.
 Enlarge diagram
What should the seller photograph?
Request the back panel, both sides of the hipbelt, the underside, the open main compartment and all size labels. Close photographs of load-bearing seams are more useful than another picture of the front pocket.
Ask whether it was stored damp, used with animals or modified. A removed frame sheet, shortened compression strap or substituted buckle may change how it carries. Confirm the lid, rain cover and removable straps if they appeared in the original specification; they are not included merely because the pack originally came with them.
For an older model, check that an essential buckle or harness is still obtainable. Do this before travelling. A repairable buckle is different from a proprietary frame attachment with no replacement available.
How do you inspect it without damaging it?
- Open the empty pack. Look along the bottom corners and seam lines. Check for holes, grit, strong odour and sticky or peeling coating. Do not scratch the lining to test it.
- Follow the load path. Inspect shoulder-strap anchors, hipbelt attachments and frame ends. Torn stitching or fabric separating around an anchor matters more than a scuffed pocket.
- Check the frame and padding. Look for an obvious bend, displaced stay, collapsed padding or a frame edge pressing through fabric. Compare both sides.
- Operate every closure. Run zippers over their full length, clip buckles and adjust webbing gently. A zipper that separates behind its slider needs attention.
- Load and fit it with permission. Use clean gear and an agreed representative load. Follow the model’s fitting sequence, starting with the hipbelt and then the harness.
- Walk, turn and reach. Notice rubbing, slippage and pressure. Remove it and check that the harness adjustment stayed in place.
Do not hang from the straps or overload the pack to prove its strength. An inspection should resemble ordinary use.
| Finding | Meaning for this purchase | Next step |
|---|---|---|
| Pack fits; one replaceable buckle is broken | A specific repair with a knowable cost | Confirm the correct part before offering |
| Hipbelt is fully tightened but still loose | The fit range is wrong | Choose another size or model |
| Shoulder anchor stitching pulls away | A structural repair may be needed | Get a repair assessment or pass |
| Sticky coating throughout | Cleaning may not restore the material | Ask the maker before buying |
| Abrasion on an intact pocket | Appearance rather than proven structural failure | Compare with similar condition |
Separate weather protection from fabric condition
A rain cover and a pack liner serve different purposes, and neither makes a damaged pack sound. Ask what the manufacturer promises for this model; a hiking pack is not automatically a dry bag.
If the seller calls it waterproof, look for the product specification. Pay attention to seams, zippers and roll-top closures. Avoid testing waterproofing by soaking someone else’s pack. An intact lining and a clear manufacturer description are better evidence than a quick splash test.
Odour deserves a deliberate decision. Airing and washing may help ordinary use smells, but the result is uncertain. If you would not want it near your sleeping gear now, do not base the purchase on guaranteed cleaning success.
Fill in a fitting record, not just a capacity comparison
Bring the bulky items that decide whether the pack works: your sleeping bag, shelter or the food container you actually use. Add a representative, comfortable load with the seller’s permission. Do not put loose weights against delicate fabric. A pack that fits a row of shop weights may still be awkward with your particular camping equipment.
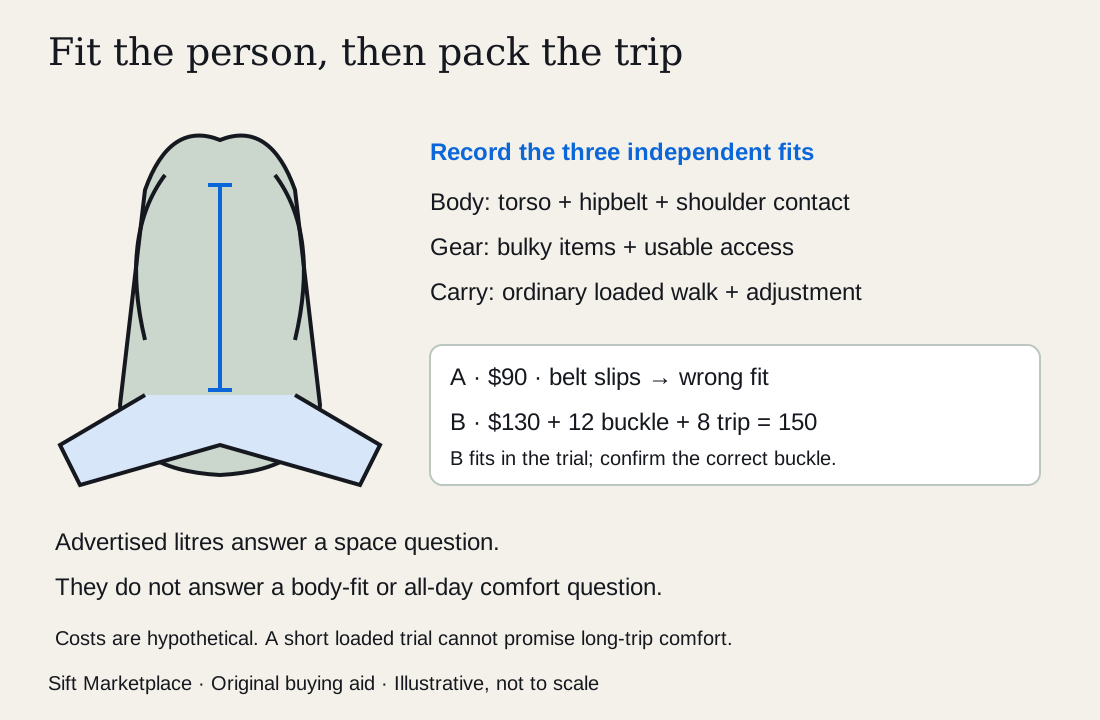
Use this record for each candidate. Measurements establish a starting range; the loaded trial decides whether that range works for your body.
| Record | Your requirement | Candidate evidence |
|---|---|---|
| Torso | Your measured torso length | Exact size label, model chart and harness setting |
| Hipbelt | Secure support with adjustment remaining | Belt size, padding contact and whether it stays positioned |
| Packed shape | Actual bulky items and normal load | Main opening closes without forcing; frame and padding remain comfortable |
| Access | What you need during the walk | Water, rain layer and snacks reachable as intended |
| Movement | Walking, turning and stepping normally | No persistent pressure, slipping or harness movement |
| Parts | Essential lid, straps, buckles and frame pieces | Included, correct, intact or specifically quoted |
Take the pack off, put it on again and repeat the ordinary adjustment. If it only feels comfortable in one carefully held position, record that uncertainty. A few minutes of walking cannot promise comfort on a full-day hike, but an immediate problem is useful evidence to reject a poor fit.
A hypothetical two-pack decision
Assume two packs both hold the buyer’s weekend gear. Pack A is $90, but its hipbelt reaches the adjustment limit and still slips during the loaded trial. Pack B is $130, fits comfortably in the same trial, and needs a manufacturer-confirmed $12 buckle; collection adds $8. B’s known cash total is $150. These are invented amounts for the decision, not market values.
A is not the better buy simply because it is $60 cheaper. The buyer has not established an available belt that changes its fit, so its problem is compatibility, not a priced repair. B can proceed to an offer once the exact buckle and replacement arrangement are confirmed. If the damaged part is a load-bearing anchor rather than the replaceable buckle, that changes the branch: seek a repair assessment or pass.
A larger stated capacity does not repair the wrong torso range. Nor does a rain cover change how the harness carries. Keep body fit, packing fit and repair cost as three separate yes/no decisions.
Decide what cleaning and repair can realistically change
A seller’s “just needs a wash” describes a proposed remedy, not its outcome. Ask what caused any stain or odour and whether the pack was stored wet. Read the maker’s material-appropriate care guidance before costing cleaning. Do not assume a machine wash, solvent or reproofing product is suitable for every component.
For a proprietary buckle or removable hipbelt, save the part identifier and confirmation of fit. Ask whether a repair service needs the whole pack, what shipping adds and whether its quote is conditional on inspection. Do not count a brand’s repair reputation as an approved free repair of this particular second-hand pack.
What is a sensible offer?
Compare the same model family, generation, torso size and accessories. A pack with the wrong hipbelt is not a useful bargain to you. Subtract confirmed repairs, a needed cover or liner and travel from what you are comfortable spending.
Do not assign a fixed discount just because a pack is a certain age. Condition, fit and available support are more useful. The fair-price guide explains how to distinguish asking prices from evidence of completed sales.
For your shortlist, write three lines: “fits my body,” “holds my equipment,” and “repairs identified.” If one remains unresolved, keep the listing in the comparison stage. An attractive price should not silently turn an unknown into a yes.
Search separately for model, capacity and size. Sellers may omit one, so an overly strict query can hide a candidate. Sift’s Marketplace filters help keep local results focused. The loaded fitting still decides which pack comes home.
Questions people ask
How do I know whether a used backpack fits?
Match your torso measurement to the exact model’s size range, then try it loaded. The hipbelt must tighten around your hips without reaching its adjustment limit, and the shoulder harness should follow your shoulders. A size label alone does not establish fit across brands or generations.
Can I wash out a sticky lining?
Sticky, flaking or powdery interior coating may be deterioration rather than dirt. Ask the manufacturer about that material before buying. Do not assume washing will restore waterproofing, or that adding a rain cover repairs damaged fabric or seams.
Is an older premium pack a good buy?
It can be if it fits and the structural parts are sound. Check repair support for the actual model. Unavailable buckles, damaged mesh and a failing lining can cancel the saving. A comfortable newer pack may be better value for your trip.
Sources
- 01Osprey Size and fit
- 02Osprey Backpack cleaning guidance